In today’s visual-oriented world, capturing beautiful images is more important than ever. One way to improve your images is with a blurred background effect, also known as bokeh.
This technique will not just draw the attention toward your main subject but add depth and range to your images, making them look more professional.
I will now give you a complete guide on how to blur the background in Snapseed to make your subject beautifully stand out!
Let’s get going!
Background the Blur in Snapseed
Snapseed, a powerful and person-friendly photo-enhancing app with the aid of Google, offers an array of gear to help you obtain these impact results easily.
With its intuitive interface and advanced features, Snapseed allows you to blur backgrounds with precision and ease.
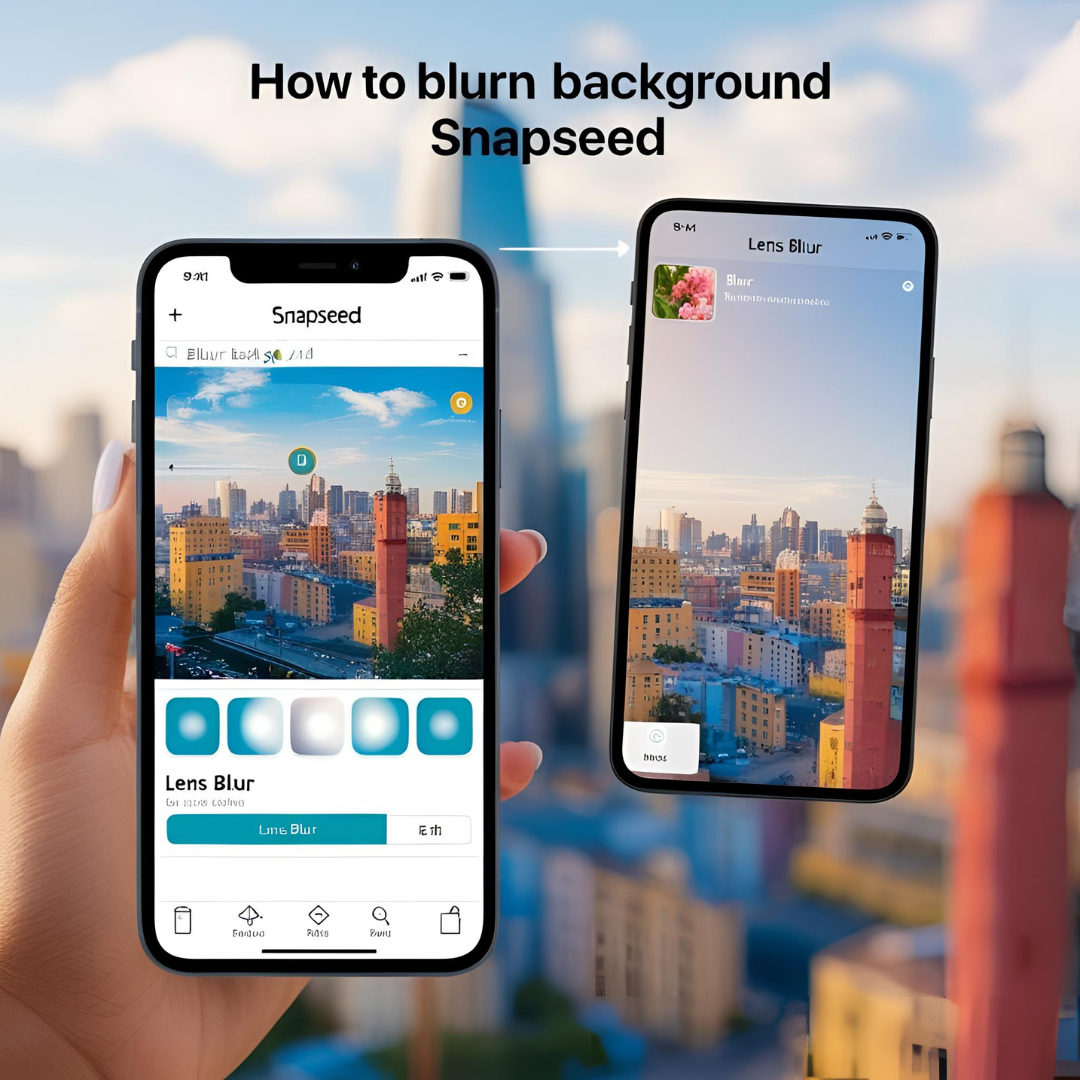
Step 1: Open Your Image in Snapseed
Start using the Snapseed app on your tool. To open your picture, absolutely faucet on the large “+” icon on the main display. Browse via your gallery and select the picture you want to edit.
Pro Tip: Choose an image with a clean situation and heritage to achieve high-quality outcomes.
Step 2: Open The “Lens Blur” Tool
When your photo is open, tap the “Tools” button at the bottom of the screen. Scroll through the list of tools until you find the “Lens Blur” tool. This tool was designed specifically to help you get the depth of heritage blur you want.
Step 3: Set The Blur Area
Once you select the “Lens Blur” tool, a circle will appear on your photo. The area inside the circle will stay in focus, while the area outside will be blurred. Use your fingers to adjust the size and shape of the circle:
- Pinch in or out with two fingers to change the size of the circle.
- Drag the circle to position it over the subject you want to keep in focus.
RELATED POSTS:
Can I Create a Photo Collage in Snapseed?
Snapseed Review
Snapseed Vs Picsart

Step 4: Fine-tune the Blur Effect
Snapseed includes additional options to fine-tune your blur effect. Click on the “Adjust” option on the bottom of the screen to see those options:
Blur Strength: Slide left or right to increase or decrease the intensity of the blur.
Transition: This adjusts how smoothly the blurry area is in relation to the focused area. Adjust to get a more natural looking effect.
Vignette Strength: Adding a vignette will also darken the edges of the image, further directing attention to the subject.
Play around with these options until you get the desired effect. Take your time to find the right combinations.
Step 5: Apply and Save Your Edits
When you are satisfied with the blur effect, click on the check mark icon to apply the changes. Now it’s time to save your edited photograph. Tap on the “Export” option on the bottom of the screen and choose the save option — and the quality that is appropriate for use.
- Save: Saves the edited photo over the original photo.
- Export: Saves the edited photo as a new file, so as not to change the original.
- Share: Shares your new creation immediately to social media, or messaging apps.
Bonus Tips for Blurring Backgrounds
- Experiment with Focus Points: Don’t be afraid to move the circle around and strive for unique cognizance factors. Sometimes, transferring the focus slightly can create an extra dynamic and attractive composition.
- Use Other Tools: Combine the blur impact with other Snapseed equipment like “Selective” and “Tune Image” to enhance shades and info, making your concern pop even greater.
Conclusion
Blurring the heritage in Snapseed is a short and effective manner to add an expert touch on your pictures. With only a few simple steps, you can create beautiful photographs that highlight your subject.